

Since totally transforming our kitchen with white pained
cabinets and a new stainless steel refrigerator, I've been enjoying the new
look each and every day. In my "farmhouse kitchen cabinet reveal" post I
mentioned that I had a whole slew of other posts in the works that had to do
with the inner workings of the kitchen project. After taking somewhat of a
break from all things kitchen-related, I'm ready to jump back in and share with
you how I spray painted most of the hardware, rather than buying all of it new,
to make it look fresh and more up-to-date.
The original hardware on the cabinets and pantry door was brass. Not my first choice, mind you, but it was what it was. There was nothing wrong with it, so it stayed put. For 12 years. That's how long we looked at it, but they're actually original to the house and the house is over 25 years old. So they've been around for a long time.
But once I decided on painting the cabinets white I knew the brass hardware had to go. And by hardware I mean the cabinet door knobs and drawer pulls as well as the pantry doorknobs. I wanted them replaced with satin nickel farmhouse-style hardware. But the hinges, well, they were a whole other story (and the main subject of today's post)! By spray painting the hinges we saved around $100.00. And since we were on a tight budget that was sweet. But I also saved on the rest of the hardware purchased as you can see below.

Overall we have thirty-three cabinet doors and nine drawers. That equals 31 new knobs and 9 cup pulls, as well as 33 sets of (or 66 individual) hinges. When I checked on prices for satin nickel knobs at Menard's they were $18.99 for 10 knobs. At that rate it would have cost me over $60 for the knobs alone. The satin nickel cup pulls were $5.49 each, so they would have cost $50 for 9, totaling over $100 for the new knobs and pulls. That's when I went online and found both way cheaper!
Store
Prices:
Knobs $18.99
(for 10) x 3 = >$60.00
Pulls $5.49
x 9 = >$50.00
Total:
$110.00
Online
(Bayport House) Prices:
Knobs:
$30.38
Pulls:
$14.60
Total:
(w/shipping) $54.70
I ended up getting 31 satin nickel knobs for $30.38 and 10 cup pulls for $14.60 for a total of $54.70 after shipping. So my bottom line came in way cheaper than the big box store prices. I was pretty happy with the savings.
In case you have trouble finding a good deal on knobs and pulls:
Now for the hinges. New hinges cost $27.99 for a pack of 20. We needed 3-plus packs so we're talking more than $84.00 for new hinges. Um, thanks but no. After all was said and done, my total saved was $140.00 plus. (Minus the cost of two cans of Rustoleum spray paint.) Yay me.

Besides, if you replace the old hinges with brand new ones, you run the risk of not being able to get the doors back on properly. Seriously, I was so paranoid about it I made sure each set of hinges (and their accompanying 10 screws) were placed in separate zip-lock bags with the cabinet door number written on the bag in Sharpie.

Yes, each cabinet had a number. I'm happy to say that my paranoia paid off in the end and all the hinges went back in beautifully. Now on to the actual painting how-to!
Just like with painting cabinets, patience is key here! Don't skip any steps and you should be fine.
spray paint
spray sealer
TSP liquid cleaner
old toothbrush
old tupperware container
all purpose fine/medium grit sanding sponge
large cardboard box(es)
optional: awl, wooden skewers, masking tape

1. Mix TSP with water in tupperware container per bottle instructions.


2. Soak hinges (minus the screws), for at least 10 minutes. Then take out and scrub with an old toothbrush. Rinse them with clean water and set aside.

3. After all the hinges have been cleaned, it's time to sand them. Yes, you need to sand them. This helps the spray paint to adhere properly. Sand the parts of the hinge that will be visible after re-installation. Your goal is to get the now clean and shiny brass to look dull. The picture shows a dirty hinge on the right and a clean one on the left. You can see I only sanded the areas that I knew would be visible after re-installation. As for the screws, since the tops were the only parts that would be visible, I just gave them a very light sanding so the spray paint would adhere to them properly.
4. Keep all the hinges and screws together in their appropriate bags. You'll be glad you did.

5. Now it's time to paint. I used Rustoleum Metallic Paint & Primer in One in Satin Nickel. Take a set of hinges with their screws inserted and push them down into your cardboard box, just hard enough to make an impression. Then use your awl to punch holes in the indentation marks. Now you can push the screws almost fully down into the holes so that the box will hold the hinges upright while you spray paint them.

I spray painted as many hinges as I could at one time, using 2 light, sweeping coats about 10 minutes apart. You need to be sure that you are spraying the hinges and screws from all angles (and not just from the top) for the appropriate coverage. And you need only concern yourself with the parts of the hinge that will be visible from the outside of the cabinet. Depending on your type of hinge the specifics will vary. Just keep that in mind and it should save you time as well as paint. Leave the hinges on the box and allow to dry. I waited 24 hours to be safe.
6. Apply one quick, thin coat of spray sealer; allow to dry per can instructions.
7. Allow the hinges to dry fully before removing them from the box. Remember, even if they seem dry, it takes some time for the paint to fully cure so be careful with them as you pull them out of the box and re-install them into the cabinets. My husband was afraid that his electric screwdriver might scratch the paint off the screws but thankfully that didn't happen.
Now on to the pantry door hinges.

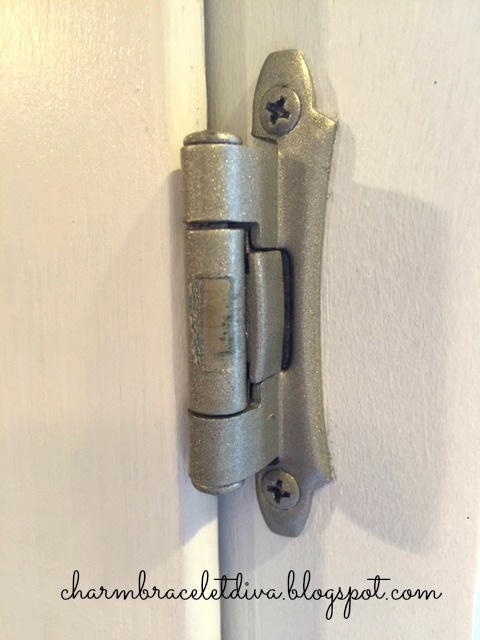
1. (DOOR) The procedure you'll follow for actual door hinges will be different than that of the cabinet door hinges since they're not the same type of hinge. Seen above are the three pantry door hinges (folded) and their pins, after cleaning and sanding but before spray painting. They're much larger than cabinet hinges.

2. (DOOR) There's no need to spray paint the pins. I just made sure to sand them well, which left them looking silver enough as opposed to their prior brassy sheen.

3. (DOOR) Just like with the cabinet hardware, you only have to paint the areas that will be visible once all is said and done. In order to do that, I taped off any sections of the hinges that did not need paint. The hinges seen above are completely taped off on this side, since the only parts that will ultimately be showing are the six interlocking pieces that are held together with the pins.

Here is the flip side of the pantry door hinges. Again, the only parts that will be visible are the six interlocking pieces and a small portion of the hinge itself. I eyeballed it and taped off just the amount I thought would not be needing paint.
Ultimately, you will have to determine for yourself what, if any, portions of the door hinge you do or do not want to paint, and tape off accordingly. Then spray.

4. (DOOR) The way I set these up for painting was to slide a wooden skewer into the hinge instead of the actual pin, then insert that skewer into the holes I had already put in the cardboard boxes with the awl. The skewers held them in place nicely.
5. (DOOR) I waited 24 hours before spraying them with clear sealer. Then I followed the instructions on the sealer can for drying time before taking them out and reattaching them onto the door.

Here is one side after painting.

And here's the other side after painting.

And here they are installed in our newly rehabbed pantry door! We also changed out the door knobs from brass to silver. I think I paid like $5.00 at Menard's. We were able to get the least expensive knobs since we didn't want the door to lock and those knobs are cheaper overall.
CAVEAT: Try not to overspray! I re-sprayed some hinges after I (wrongly) thought they weren't covered well enough. Come to find that with each coat of paint you are making the hardware fatter and fatter (for lack of a better word) and if that happens the hinge might not fit back into its place like it did before.
Case in point: on the surface this hinge looked great after I painted it. BUT I oversprayed and now when you open and close the cabinet door part of the hinge scrapes against another part of the hinge and pulls the paint off. Only 2 out of 33 did this so it wasn't a huge deal but I thought it was definitely worth mentioning.

Overall we have been quite happy with our kitchen transformation, and even happier with the savings that came from spray painting most of the hardware rather than buying new!

Be sure to stay in touch:


Yes, each cabinet had a number. I'm happy to say that my paranoia paid off in the end and all the hinges went back in beautifully. Now on to the actual painting how-to!
Just like with painting cabinets, patience is key here! Don't skip any steps and you should be fine.
Cabinet and Door Hardware Spray Painting Materials
original hinges/hardware with screwsspray paint
spray sealer
TSP liquid cleaner
old toothbrush
old tupperware container
all purpose fine/medium grit sanding sponge
large cardboard box(es)
optional: awl, wooden skewers, masking tape
How To Clean and Spray Paint Cabinet and Door Hardware

1. Mix TSP with water in tupperware container per bottle instructions.


2. Soak hinges (minus the screws), for at least 10 minutes. Then take out and scrub with an old toothbrush. Rinse them with clean water and set aside.

3. After all the hinges have been cleaned, it's time to sand them. Yes, you need to sand them. This helps the spray paint to adhere properly. Sand the parts of the hinge that will be visible after re-installation. Your goal is to get the now clean and shiny brass to look dull. The picture shows a dirty hinge on the right and a clean one on the left. You can see I only sanded the areas that I knew would be visible after re-installation. As for the screws, since the tops were the only parts that would be visible, I just gave them a very light sanding so the spray paint would adhere to them properly.
4. Keep all the hinges and screws together in their appropriate bags. You'll be glad you did.

5. Now it's time to paint. I used Rustoleum Metallic Paint & Primer in One in Satin Nickel. Take a set of hinges with their screws inserted and push them down into your cardboard box, just hard enough to make an impression. Then use your awl to punch holes in the indentation marks. Now you can push the screws almost fully down into the holes so that the box will hold the hinges upright while you spray paint them.

I spray painted as many hinges as I could at one time, using 2 light, sweeping coats about 10 minutes apart. You need to be sure that you are spraying the hinges and screws from all angles (and not just from the top) for the appropriate coverage. And you need only concern yourself with the parts of the hinge that will be visible from the outside of the cabinet. Depending on your type of hinge the specifics will vary. Just keep that in mind and it should save you time as well as paint. Leave the hinges on the box and allow to dry. I waited 24 hours to be safe.
6. Apply one quick, thin coat of spray sealer; allow to dry per can instructions.
7. Allow the hinges to dry fully before removing them from the box. Remember, even if they seem dry, it takes some time for the paint to fully cure so be careful with them as you pull them out of the box and re-install them into the cabinets. My husband was afraid that his electric screwdriver might scratch the paint off the screws but thankfully that didn't happen.
Now on to the pantry door hinges.

1. (DOOR) The procedure you'll follow for actual door hinges will be different than that of the cabinet door hinges since they're not the same type of hinge. Seen above are the three pantry door hinges (folded) and their pins, after cleaning and sanding but before spray painting. They're much larger than cabinet hinges.

2. (DOOR) There's no need to spray paint the pins. I just made sure to sand them well, which left them looking silver enough as opposed to their prior brassy sheen.

3. (DOOR) Just like with the cabinet hardware, you only have to paint the areas that will be visible once all is said and done. In order to do that, I taped off any sections of the hinges that did not need paint. The hinges seen above are completely taped off on this side, since the only parts that will ultimately be showing are the six interlocking pieces that are held together with the pins.

Here is the flip side of the pantry door hinges. Again, the only parts that will be visible are the six interlocking pieces and a small portion of the hinge itself. I eyeballed it and taped off just the amount I thought would not be needing paint.
Ultimately, you will have to determine for yourself what, if any, portions of the door hinge you do or do not want to paint, and tape off accordingly. Then spray.

4. (DOOR) The way I set these up for painting was to slide a wooden skewer into the hinge instead of the actual pin, then insert that skewer into the holes I had already put in the cardboard boxes with the awl. The skewers held them in place nicely.
5. (DOOR) I waited 24 hours before spraying them with clear sealer. Then I followed the instructions on the sealer can for drying time before taking them out and reattaching them onto the door.

Here is one side after painting.

And here's the other side after painting.

And here they are installed in our newly rehabbed pantry door! We also changed out the door knobs from brass to silver. I think I paid like $5.00 at Menard's. We were able to get the least expensive knobs since we didn't want the door to lock and those knobs are cheaper overall.
CAVEAT: Try not to overspray! I re-sprayed some hinges after I (wrongly) thought they weren't covered well enough. Come to find that with each coat of paint you are making the hardware fatter and fatter (for lack of a better word) and if that happens the hinge might not fit back into its place like it did before.

Case in point: on the surface this hinge looked great after I painted it. BUT I oversprayed and now when you open and close the cabinet door part of the hinge scrapes against another part of the hinge and pulls the paint off. Only 2 out of 33 did this so it wasn't a huge deal but I thought it was definitely worth mentioning.

Overall we have been quite happy with our kitchen transformation, and even happier with the savings that came from spray painting most of the hardware rather than buying new!
I hope you enjoyed reading
How To Spray Paint
Cabinet Hardware
Like A Pro.
Thanks for spending time with me today!
How To Spray Paint
Cabinet Hardware
Like A Pro.
Thanks for spending time with me today!
Don't forget to Pin it!

Be sure to stay in touch:


Leave a Comment!
Love how your hardware turned out Kathleen. The Satin Nickel is so pretty.
Great tips, Kathleen. I love the paint color too!
You did a fantastic job on them, Kathleen. I paint a lot of hardware, too. Especially on older pieces that won't accept modern handles with holes that are drilled in different spots than new hardware.
Your kitchen looks fantastic!!! xo Diana
Sure have to hand it to you for all your figuring, sanding, spraying,your cabinets/pantry door turned out like professional. Imagine was lot of work but saving money is a really big plus for all that effort.Look at how beautifully your kitchen turned out, do you feel it was worth all your efforts and time?
Your new fridge is gorgeous also. Inspires me to get off my duff to paint our kitchen cabinets and paint hardware.
Our portable kitchen island is out on back deck under tarp waiting for us to finish painting. Also want to paint hardware off island.
Great tutorial, thanks for documenting all the steps in such detail, really helps.
Enjoy your "new" kitchen andrest of week
Your hardware turned out great. I have never painted hardware and would not have thought about the fit problem with hinges. Thanks for the tips too.
I love the power of paint! Those turned out great. I know it was a lot of work but well worth the savings.
It looks like I have almost the exact same kitchen layout that you do. I'm wondering how far past the bar your backsplash is extended. I'm wanting to add a backsplash but not sure how to finish off that side. Any additional pics of it? Thanks!
You said you painted as many hinges as you could at once. How did you keep track after they were taken out of the bag marked for their cabinet location?? That’s what I can’t figure out. Thank you!
You said you painted as many hinges as you could at once. How did you keep track after they were taken out of the bag marked for their cabinet location?? That’s what I can’t figure out. Thank you!
Post a Comment